
You are growing for the first time outdoors and you notice that one or more of your plants are beginning to flower. You don’t want this, you were not expecting this, but what are you going to do about it?
The first time one of my plants tried to flower early, I felt like such a failure. Clearly, I had done something wrong, or at least, it felt like I had. The beds were full of clones and some were growing beautifully. Others were not so sure and still others made the choice to flower almost immediately. What was I doing wrong?
The answer was that I was learning.
So what do you do when a young plant tries to flower early? You have two choices. First, you can just let her flower, which many people choose to do because they don’t want to do anything that they feel harms the plant. They feel this is the will of the plant, and I respect that.
But I don’t abide by it. I have let early-flowering plants go to harvest, but it has always been a strategic decision related to the particular grow. In most cases, I have attempted (and succeeded) in bringing the plants back to the vegetative cycle. It’s one of my least favorite things to do, but I have done it, and I’ve had lots of practice. I’ve had early flowering plants every year except this year.
The key is to immediately strip every starting flower from the plant. You cannot leave any, even the tiniest residue, or the plant will continue to believe it’s flowering. The approach I have found to work the best is to strip the flowers one day and the next day pour a specific formula of compost tea. I use the usual ingredients, but I add a full cup of fish emulsion, which is all nitrogen. I don’t want any other “grow” type fertilizer in this tea. I don’t want any trace amounts of phosphorus or potassium – only nitrogen. The goal is to strip the flowers and force the plant back into vegetative growth.
This is not a happy process for either me or the plant. I hate doing it to the plant and I’m certain the plant doesn’t enjoy it, either. But pour that fish emulsion tea early the next morning and then watch. It might be a couple of hours, but you’re liable to start seeing the return of vegetative growth. Sometimes, it has taken me more than one tea to get the plant to switch, but it’s unmistakable when it happens. Usually, if it doesn’t switch back right away, it is because I missed removing a new flower somewhere on the plant. It can take a couple of hours, or even to the next day before you have evidence that the switch back to veg has occurred. But when you see it, you can safely resume treating the plant as vegetative. The plant will often look and grow unusually after that, but at least the flowers that eventually emerge will benefit from nearly a full season of growth.

Love, Lucy was an early flowering plant that I turned back to Veg and she turned out beautifully.
What about a plant that starts to show male or hermaphrodite characteristics in the beds? I have only had males show outside, never a hermaphrodite. I did have one indoors. In either case, go get a large, black plastic bag and carefully cover the plant with it. Grab the base of the stalk and pull the plant out, keeping it covered completely as you remove it. Then, remove the unwanted plant from the premises. I put mine into the green compost bin that gets picked up every week.
This is important: It is not ok to keep a male plant in your outdoor grow site. Other growers within a quarter mile of your male plant have the right to grow without getting their plants fertilized by your carelessness. NOT OK.
Please dispose promptly and safely. End of lecture.
Another common problem for new growers are pathogens. What to do when your beautiful, pristine plant suddenly develops a scorching case of powdery mildew?
Pathogens used to be a huge problem for me, and if you are not prepared, you’ll be shocked. I use foliar sprays to control all my pathogenic activity. I use Regalia to control powdery mildew and I use Stargus to prevent mold. This sounds relatively simple and it is, but it requires discipline to spray when you need to spray and never skip a day when it’s needed. It also requires money for the foliar sprays. You can get away from needing to do that if you live in the perfect growing environment, 24/7. But most of us don’t have that particular luxury.
Insects can lead to pathogens and insects can also bite and harm your plants and flowers unless controlled. For example, the Western Cucumber Beetle, (aka the green ladybug) can bite young plants enough to cause bacterial wilt. Those branches have to be removed.The first method of control for us are companion plants, like borage, calendula, marigolds, and poppies, to attract the beneficial, predatory insects that you want. A few weeks ago, when it was still too chilly for these beneficial predators to have arrived, I dealt with an aphid attack on some of our early feminized starts using some Dr. Bronner’s soap. But if aphids arrive today looking for trouble, they will be met with predatory insects like the American HoverFly or the Assassin Fly, among many others.
I also use an IPM (Integrated Pest Management) foliar spray every week. I alternate Grandevo with Venerate.
Between those sprays and the beneficial insects, we no longer have an insect problem. Right now, our beds are swarming with predator flies and they are getting busy.

The vibes are apparently very good in our beds.
BT is another foliar spray, specifically for moth worms. I want to bring special attention to this because worms can be the deciding factor on whether you ever grow outdoors again. I know people who have stopped growing because they cannot tolerate killing worms.
We don’t like killing things if we can help it. The second year we grew, I decided to not spray BT, because killing all of those living creatures bothered me. We had 17 plants and by the middle of September, we had the worst mold outbreak I’ve ever experienced. We lost over 40% of our crop to mold that year. We tried to pick off the worms and relocate them by hand. And in the end, the only way we could save our crop was by spraying BT.
I’ll admit, I was a fool. I no longer care how many worms do not survive their summer in my garden.
If you use BT, you can prevent the kind of mold caused by worm damage. If you don’t, your crop will be moldy. That is the choice.
Or you can grow indoors.

Something that is NOT an unexpected problem: during the vegetative phase, when you see a leaf folded in half, there is usually a spider in there and you should leave them alone. They will eat bad insects for you.
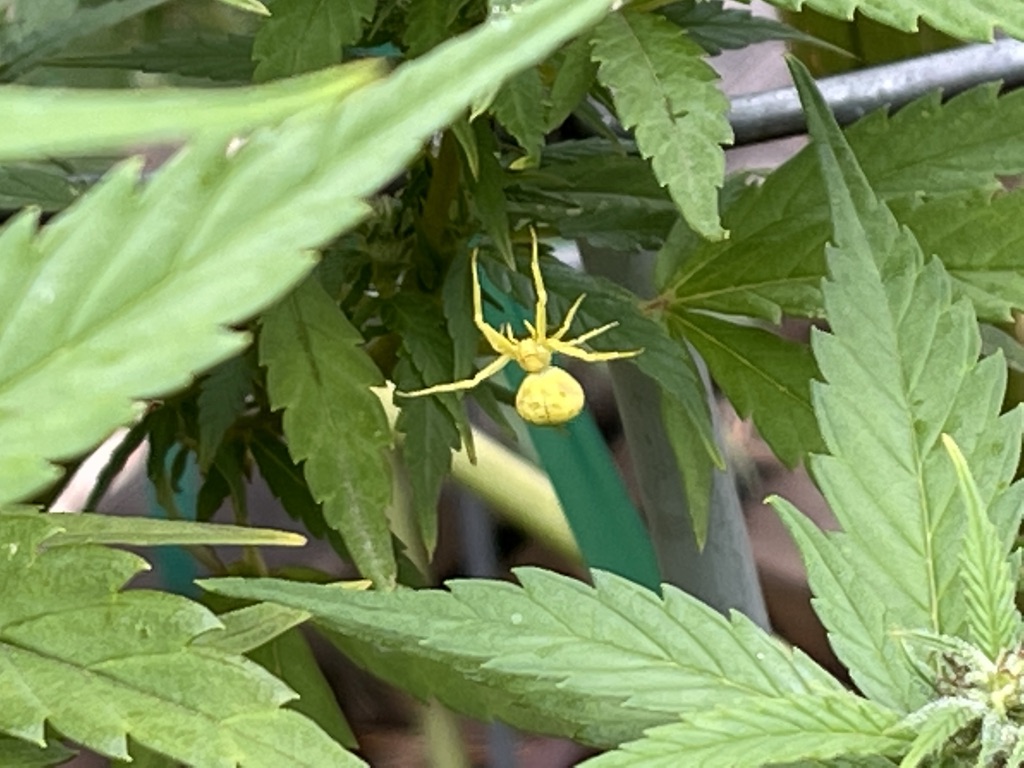
A favorite of ours–the hermit crab spider.

Worm, about to be an ex-worm.
However, during the flowering phase, when you see a folded leaf, it’s not a spider, it’s a worm and it needs to be eradicated.
Remember that you can also wash all pathogens from the plant at the end of harvest. And no, you’re not washing off all the medicine when you wash the plant. I won’t try a plant that hasn’t been washed, and my test scores have all been on washed plants, so it doesn’t impact potency.
And I bet I know what some of you worm lovers are thinking that you’d let the worms live and wash the mold away at harvest. I would not recommend this. But if any of you try it, please let us know how it worked out. BTW, you’ll drown a lot of worms, too.
I mentioned the foliar spray, Stargus. This product is a game changer. Everyone who grows outdoors and has any kind of variable humidity should spray Stargus on their developing cannabis flowers once a week. It stops botrytis.
Another common issue with new growers is an accident with your plant. We have hurt ours before, by carelessly cutting things down and not applying honey to the wound, or ripping off fan leaves that tear away bark. I suggest always having honey on hand for each and every wound. I have broken off entire branches with the hose of my foliar sprayer. It got caught and I didn’t see that it got caught. I moved quickly and a branch snapped. That was on a Sour Tsunami and it cost about ⅛ of her flowers, a costly mistake.
However, sometimes mistakes like that can lead to a more powerful plant. We have a prime example in our grow right now. A couple of inner branches broke from the Cherry Punch in bed 15. The breaks were caused by the plant clips that we love to use. This surprised us, but we now realize those clips were designed for normal growing plants, not monsters with thick, expanding stalks and branches.

The photograph above is of the Cherry Punch plant’s first top, which is about three feet off the ground. Usually, a stalk is getting thinner by this point, but this one is as thick or thicker than the base of the plant. And those are the two strongest and gnarliest looking tops I’ve ever seen in all my years of growing. The thickness of the stalk and the strength of the new tops make me think of a Tom Waits song, where he asks, “What’s he building in there?”
This is not an unexpected problem. It’s pretty much the opposite of a problem, but it’s worth noting; especially the thickness of the growth, because there are reasons for that thickness, and that leads us to an unexpected problem: We’ve learned the hard way that the yellow plant clips we’ve been using so successfully for plant stress should not be used on either of the Cherry Punch plants. These plants are growing too vigorously and the stalks are thicker than the clips can comfortably contain. We’ve had a number of broken branches on those two plants because of the clips, especially on bed 15.

Those plant clips are fantastic and completely effective, on normal sized cannabis plants. They seem to be doing their job of stress training on most of our other plants. But not the Cherry Punch cultivar. We’ve got two of them and they are both now well over three feet tall. They are in full sprint, growing an inch a day. There’s no slowing them down. We might top them again and direct more energy out, but the stalk is going up, too, regardless.
On the other hand, one of the reasons for the vigorous growth on the new tops are those broken bits. When plants get damaged, auxins are rushed to the scene of the problem to compensate for the loss. I think we see that happening in the vigor of the tops shown above. It makes me excited to see what will grow from there.
There is one other factor for the thickness of the stalk and that is the fresh vein of raw mycorrhizae I have mined from beneath part of our buckeye tree cluster. Putting raw mycorrhizae into teas and aerating 48 hours will open the stoma of each plant to receive up to 45% more nutrients from your tea than it would have received without the fungus.
Finding raw mycorrhizae was unexpected (though perhaps it shouldn’t have been given that we live in a forest), and its presence is very good news. This is the sort of unexpected situation I’ve been hoping for. I believe I mentioned hunting for raw mycorrhizae in the Isolation Grow Blog back in 2020. We finally found it. For the record, I’m not limiting how much is used per tea. I’m using a lot of it, and you can use as much mycorrhizae as you want with no harm to plants or soil.

The white stuff is a vein of raw mycorrhizae that I dug up recently.
We saw this stem-thickening happen last year when we used raw mycorrhizae for the first time. The stems tend to stay thicker all the way up to the top of the plant. There are even bulges in the stem at various points that are thicker than the actual base.

Note the thickness of the upper stem. It’s virtually the same size as the base of the plant.
So regarding stressing and training, we’re backing off the clips a bit. For the cultivars, it’s a return to the tried-and-true plant tape, though we are trying to wean ourselves from it, because it’s not sustainable. We thought the clips would carry the brunt of training, but we are discovering their limitations, which is a good thing to know.
Two years ago, we had a completely unexpected situation: Right after transplanting all our plants into beds we had three weeks without the sun. All but two of our plants tried to flower. I managed to turn most of them back to veg growth, though it was the least attractive looking group of cannabis and hemp plants I’ve ever grown. (Sorry, no pictures.)

This situation is what eventually got me to buy the supplemental lights for outdoors. If any of you are having problems getting twelve hours of light for your plants, investigate small led lights that you can use strategically outside to trick your plants. The lights I’m using outside now cost me $40 apiece. I’m using three to light all my beds and it’s working. There are no early flowering plants this year. You have to make sure you use the lights in such a way that doesn’t disturb people living around you. I’ve managed to do that and it has solved the problem of early flowering plants.

Hey Friends: If you’d like to support jeffreyhickeyblogs.com, please feel free to donate to PayPal @jeffreydhickey.
Or contact me directly with your idea (good seeds are always welcome–and if I grow them, I will get the flowers tested and share with you the results.
Disclaimer: The majority of the links in jeffreyhickeyblogs.com posts are affiliate program links. This means that (most of the time) when you purchase a product linked from my site, I receive a commission.

Leave a comment